

6/21/2012 SifBeth's website seems to be offline for repairs due to a crash. Below is the poppy tutorial gleaned from the WayBack Machine.

Wrap a piece of black cotton thread some 50 times around two fingers. Not too tight! Now you have a loop - fold it in half and twist a piece of gauge 33 floral wire around it. Make sure you remember to leave an extra loop on top of the wire - I forgot in this picture. You need it for the flower centre.
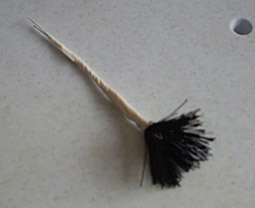
Cut the loop open and tape the bottom and the stem. If you look carefully you can see the little white loop in the middle of the thread..

Roll a small ball of spring green gumpaste for the centre. Give a slight UFO shape and glue it to the loop in the centre. With a pair of tweezers, pinch the gumpaste to form the typical poppy pattern.

Now the petals. Cut out two large an two smaller petals. Frill the edges with a large frillstick and vein with either a silicone veiner og, as here, a dresden tool. Leave to dry in a curve over a ball of cling wrap or in a flower former.

When dry, paint the bottoms with a bit of undiluted black paste color. Or black petal dust if you have any (if you do, please tell me where you found it!)
For assembly, tape the smaller petals around the base, opposite of each other. Turn the flower a quart and tape the two larger petals just underneath. Tape the whole stem. And voila!
No comments:
Post a Comment